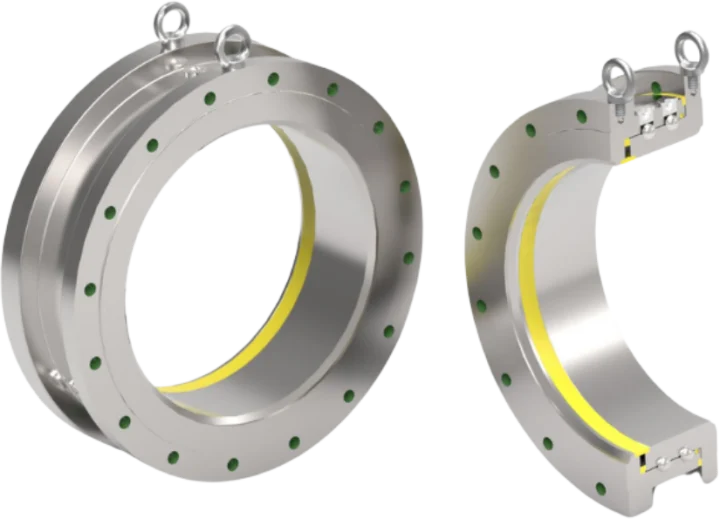


It’s time for the next instalment of our “How to…” series, where we provide maintenance tips to ensure the longevity of EWFM products. In previous editions, we discussed maintaining Model 2715 and 2714 Swivel Joints. In this month’s edition, we will focus on servicing a MannTek Dry Disconnect Coupling. Dry Disconnect Couplings are designed to enable spill-free, quick, and dry connections and disconnections of hoses and pipelines. To service the coupling effectively, there are specific rules that need to be followed to ensure your safety and the protection of the coupling. These are:
- Always need to depressurise the system and rinse off the parts before beginning any maintenance work.
- Do not handle O-ring seals if the material appears charred, gummy, or sticky.
- Do not touch adjacent parts with unprotected hands.
- Rinse off the parts once again before starting the “daily inspection”.
- Wear protective googles and gloves during the service.
(The below is the service instructions based on a 4” MannTek Dry Disconnect Coupling, the process will be similar for smaller and larger sizes.)
How to service the Tank unit:
- Remove the flat sealing, ensuring you don’t scratch the seal face. (Skip step if you have an NPT-Thread)
- Press down the spindle steering and turn it to release it. Take out the spindle steering, spring cap and spring from the body.
- Remove the piston and put it into a relaxing position in the valve seat.
- Replace the PTFE bushing (Pos.5) in the spindle steering.
- Replace the O-ring (pos.3) on the piston with a new greased O-ring. Ensure that there is equal pressure around the O-ring with it being pressed into the groove completely.
- Insert the piston back into the unit in a relaxed position in the valve seat.
- Replace the spring (pos.7), spring cap (pos.6) and the spindle steering (pos.4).
- Place the spindle steering back into the unit. To fix it into the correct position, press down and turn. Ensure that it is in the correct position.
- Assemble a new flat sealing (pos.12).
- Finally, make a visual inspection to ensure everything is in the correct place. Also test it works but connecting and disconnecting a hose unit with the newly service tank unit.
How to service the hose unit:
- Begin by unscrewing and removing the lock screw from the swivel ring by using a 2mm hex key.
- Mark the position of the swivel sleeve against the swivel ring with an 8mm pin. Unscrew and remove the swivel sleeve from the swivel ring.
- Change the PTFE ring (pos.25) on the top of the coupling body.
- Remove the two shafts for piston guide, by applying pressure to the driving plate packet so that it moves down 2 mm. This will release the driving plate packet from the rollers.
- Turn the driving plate to the position where the recess ends up under the rollers under pressure to the driving plate packet. Remove the driving plate packet from the hose unit body.
- Remove the protective ring.
- If needed, you can change the O-ring (pos.21) for dust protection. Ensure the handle has been dismounted and the new O-ring has been greased.
- Change the three shafts (pos.18), locking nuts (pos.19) and rollers (pos.17) to new ones. Check that the roller easily rotate now.
- Mount the protective ring back on. To ease the mounting of the protective ring applying grease on the inside of the protective ring is recommended.
- Change the O-ring (pos.24) from the groove in the coupling body. Use grease on the new part. Apply grease on the balls for best possible swivel rotation.
- Ensuring that both have been greased, Change the O-ring (pos.8) and PTFE ring (pos.9) on the driving plate back side.
- Change the PTFE bushing (pos.13) to new ones on both sides.
- Change the newly greased O-ring (pos.6) on the driving plate front side.
- Change the newly greased O-ring (pos.3) on the piston. Change the O-ring (pos.3) on the piston.
- Change the PTFE bushing (pos.16) to new ones on both sides.
- Before placing the coupling body back on the driving plate packet, make sure the part where the upper cam curve ends, is placed exactly over one roll, and the heel on the driving plate packet is placed under the hole for the shaft.
- Place the coupling body over the driving plate packet. Grab the piston guide and turn the unit upside down. Press down and turn the driving plate to the position where the driving plate heels are placed under the rollers.
- Assemble the two shafts for piston guide when applying pressure to the driving plate packet.
- Place a new flat seal (pos.29) on the swivel sleeve.
- Place the swivel sleeve over the coupling body and screw in the swivel sleeve. (Take care that the markings you made in the beginning are aligning. If necessary apply anti seize lube on the threads.)
- Use Loctite® 243 and screw the lock screw into the swivel ring without any force as this could lead to deforming of the ball bearings!
- Apply sealing wax on the top of the lock crew after screwing it in, to prevent misuse.
- Finally, make a visual inspection to ensure everything is in the correct place. Also test it works but connecting and disconnecting a tank unit with the newly service hose unit.
For a better viewing, you can find the video of how to service you Dry Disconnect Coupling below:
[vc_video link=”https://youtu.be/7H7gf4W0qVE” el_width=”70″ el_aspect=”43″ align=”center” css=”.vc_custom_1688650642186{margin-top: 0px !important;margin-right: 0px !important;margin-bottom: 1px !important;margin-left: 0px !important;border-top-width: 0px !important;border-right-width: 0px !important;border-bottom-width: 1px !important;border-left-width: 0px !important;padding-top: 0px !important;padding-right: 0px !important;padding-bottom: 1px !important;padding-left: 0px !important;}”]
If you have any questions about the above or would like to order your own replacement seal kit, then please get in contact with our sales team who we will be more than happy to assist you.
Contact information:
Tel : +44 (0) 1763 248650
Email : sales@ewfm.co.uk
To keep up to date with news on how we are supporting our customers, our latest blogs and new services available, keep checking in on our website throughout the year and follow us on social media including LinkedIn, Facebook, Twitter & Instagram.
