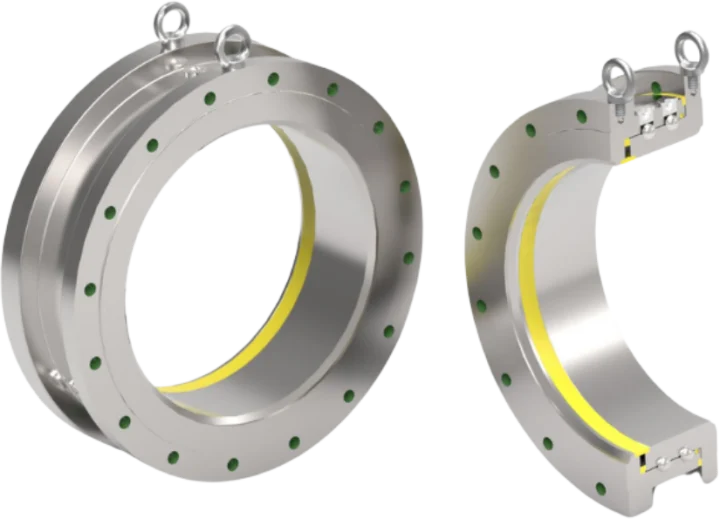


It’s time for the next edition of “How to…” series. In this series, we will be looking at how you can maintain EWFM products to ensure a longer life. In this first blog of the series, we looked at how you can maintain a Model 2174 Swivel Joint. This month, we will be discussing how you can preserve a Model 2715 Swivel Joint. We advise all our customers to check our range of Swivel Joints every six months to ensure there is no leakage and their manoeuvrability is consistent and uniform during the rotation process. When you are surveying a Swivel Joint, it is important that there is no product within the joint.
Disassembling the Model 2175 Swivel Joint:
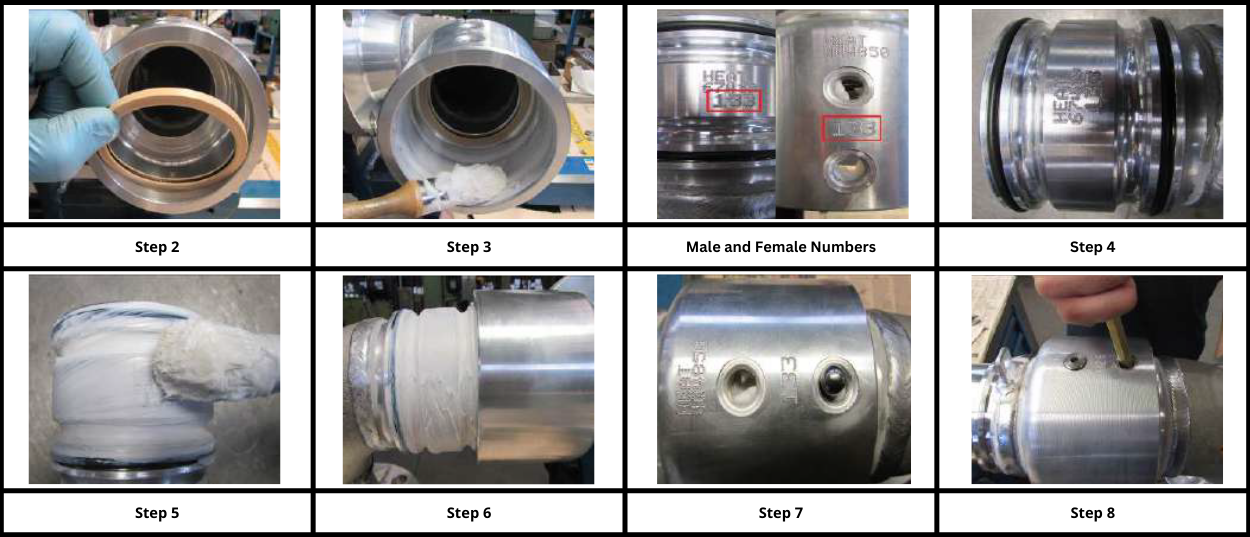
- Unscrew the ball plugs and the grease nipple of the female part of the Swivel.
- Block the Swivel Joint so that the holes of the ball bearing are facing downwards.
- Gradually start to turn the male of the Swivel to allow all of the balls to exit the holes. Introduce compressed air through the grease nipple hole. Alternatively, a common solvent for grease such as kerosene can be inserted into the ball raceways holes. (Only start Step 4 if Step 3 has been completed).
- Extract the male part of the Swivel Joint.
- Remove the seal in the female part and the 2 O-rings found in the male part of the Swivel.
- Clean both parts of the Swivel of any residual grease.
- Check the integrity of both parts of the Swivel Joint. If there is excessive corrosion, it is advised that you get in contact with the manufacturer as that process requires special attention.
Reassembling the Model 2175 Swivel Joint:
- Block the female part of the Swivel so that the holes of the ball bearing raceways are turned upwards.
- Insert the primary seal into the female part so that it leans on the bottom. Lubricate the seal with only a little quantity of specific grease.
- Using a brush and specific grease, grease the inside of the female part of the Swivel.
- Take the male part of the swivel and insert the 2 O-rings into the correct position. Then, using a brush again, apply the grease to the outside of the male part. (Ensure that during assembly, the numbers indicated on the sides of each part match as this can reduce working life and manoeuvrability).
- Now, you can take the male part and insert it into the female part of the Swivel.
- Once inserted, you can start to introduce the ball bearings back into the first raceway by turning the male part. The ball bearings must be inserted one at a time and continuously, in order to avoid extra space between them.
- In case all of the ball bearings are not inserted but there is no space left in the raceway, introduce a brass bar into the hole and at the same time turn the male part of the swivel, which will compact the ball bearings together.
 Warning – Ensure no damage is caused to the sealing surface of the male part of the Swivel during the maintenance stages. If you have any questions about the above or would like to order your own replacement seal kit, then please get in contact, and we will be more than happy to assist you.
Contact information:
Tel : +44 (0) 1763 248650
Email : sales@ewfm.co.uk
To keep up to date with news on how we are supporting our customers, our latest blogs and new services available, keep checking in on our website throughout the year and follow us on social media including LinkedIn, Facebook, Twitter & Instagram.
